Azure Blob Storage and Node: First Steps
This is part of a series on working with Azure Blob Storage in Node.
Getting Started With Azure Blob Storage and Node
The Azure team has made it really simple to start using Blob Storage in Node. The first thing you’ll want to do is install the azure-storage module into your project.
1 2 | |
Create Storage Account
Unless you already have one, you’ll need to create an Azure storage account. They’re pretty simple to create. From the Azure portal, click “New” in the bottom-left. Select “Data Services”, then “Storage”, then “Quick Create”.
Enter a unique name for your account. Under “Location/Affinity Group”, choose a location. Ideally, you should choose the same location as your web site or web service. If in doubt, choose the location nearest to you.
During dev time, you probably won’t want to work against production data. To avoid this, you can create a second storage account using the steps above.
Configure Access Keys
In order for your Node app to connect to your storage account, you’ll need to configure it with its access information. These instructions assume you’ve already created an Azure Website.
There are two ways to configure the azure-storage module’s access info. One way is by constructing an Azure client object with a hardcoded account name and an access key. The problem with this approach is that it requires checking your access key in with your code, which you shouldn’t do.
The other appraoch is to use environment variables to store your account info.
The azure-storage module will pick up specific environment variables and use those to connect to your storage account.
Those environment variables are AZURE_STORAGE_ACCOUNT and AZURE_STORAGE_ACCESS_KEY, or AZURE_STORAGE_CONNECTION_STRING.
In our example, we’ll use the first two.
First, in the Azure portal, navigate to your storage account. At the bottom of the screen, click “Manage Access Keys”.

Copy the primary access key, then navigate to your website’s “Configure” tab.
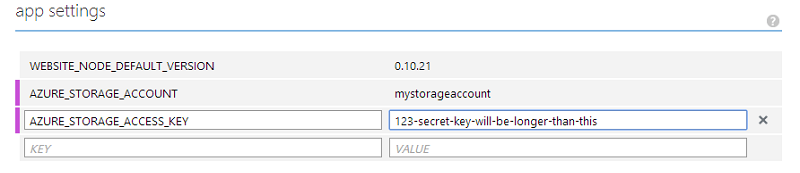
Under “app settings”, add two new settings:
AZURE_STORAGE_ACCOUNT with your storage account name, and AZURE_STORAGE_ACCESS_KEY with the access key you just copied.
For local dev, you’ll also need to set up credentials for your dev storage account (or production if you didn’t create a dev account).
On Linux and Mac, you can set environment variables in your .bash_profile.
Instructions for that are outside the scope of this post.
On Linux and Mac you can also set environment variables specifically for an app run. This also works on Windows if you’re using something like Git Bash.
1
| |
On windows, the easiest option is to configure environment variables in your machine settings. These instructions are for Windows 8. You’ll have to look for instructions for older versions of Windows, but the idea is pretty much the same.
- Open the start screen.
- Type “environment”.
- Click “Edit environment variables for your account” should come up.
- Click the “New…” button.
- Enter “AZURE_STORAGE_ACCOUNT” for the “Variable name” and your storage account name for the “Variable value”
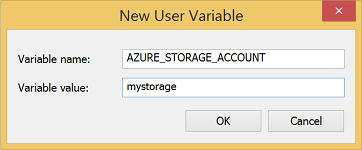
Repeat steps 1 through 5 again for the “AZURE_STORAGE_ACCESS_KEY” variable, then click “OK” to close the “Environment Variables” screen. If your console is open, restart it.
Write Some Code
Now that we’ve gotten the configuration taken care of, we can write some code.
We’ll dive into the code more in the next post, but for now, here’s something to get you started.
1 2 3 4 5 6 7 8 9 10 11 12 13 14 15 | |
If you run the above code after configuring your account credentials, it should output “Container your-container-name created”. If you run it again, it should output “Container your-container-name already exists”.
Azure only creates the container if it doesn’t exist. If it already exists, the library will tell you, but it won’t give you an error.
Conclusion
We’ve looked at how to get set up with Azure blob storage. In the next post, we’ll talk about creating blobs.